growing magic mushrooms for the first time
growing magic mushrooms is a relatively simple process: add spores to food and a growth medium, and wait for nature to spin straw into gold. But psychedelic mushroom cultivation has been cloaked in confusion by decades of underground literature. New growers are met with a dizzying amount of terms to learn and told to buy a laundry list of lab equipment. Plus there are varying opinions and methods on how to grow them.
So we created a beginner-friendly guide to growing psychedelic shrooms. Our goal is to minimize initial expenses and keep things simple to set up first-timers for success.
click here to buy magic mushrooms in the usa
How do you grow shrooms?
Most psychedelic mushroom cultivation methods share these core steps:
- Sterilization: A food source (rice, grain, manure, sawdust, popcorn kernels, bird seed, etc.) is first hydrated, loaded into Mason jars or Unicorn bags, and sterilized. Think of this as clearing a field before planting an orchard. Once competing organisms are gone, mushrooms can take hold easily.growing magic mushrooms
- Inoculation: The sterilized mushroom food is inoculated with spores or a living mushroom sample. These clones produce uniform mushrooms, or fruit, and multi-spore cultures can create countless variations.
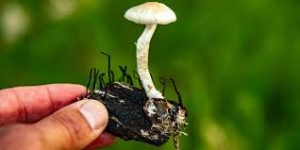
- Germination & colonization: The inoculation is given time to mature and colonize the food source, becoming a white and fluffy mycelial network—like roots, but for mushrooms—and eventually, mushrooms.
- Fruit block assembly: After colonization, a grower breaks up the inoculated food and mixes it into a substrate, or growing medium—commonly coco coir, vermiculite, or sphagnum. The substrate provides the structure and water that mushrooms need to mature. Once thoroughly combined, the mixture is sealed inside a plastic bin.
- Fruit block colonization: Inside a sealed bin, mycelium spread into the substrate. The goal is to establish a fruit block, in which the mycelium joins the food and substrate.
- Pinning: Once the block is fully colonized, primordia—aka “pins”—begin to form, indicating that it’s time to introduce fruiting conditions. These pins will eventually swell and rise from the fruit block as mushrooms.
- Fruiting: During fruiting, young mushrooms want high humidity levels and plenty of oxygen, circumstances referred to as “fruiting conditions.” As mushrooms grow, they consume oxygen and release carbon dioxide. Without the exchange of fresh air for CO2, mushrooms become susceptible to growth defects, dudding, and pathogens. If humidity levels drop too low, a substrate will eventually dry out and starve mushrooms of water. growing magic mushrooms
What’s the easiest way growing magic mushrooms ?
(Anonymous)
After trying numerous techniques ranging from PF Cakes to monotubs, we devised an easy, cheap, and quick way to grow shrooms in small quantities, that has a high success rate. It’s a simplified variation of the Uncle Ben’s or Broke Boi TEK. You won’t need any spendy specialized equipment, and the supply list is limited to items available at your local grocery or hardware store (with one or two exceptions).growing magic mushrooms
The technique involves using bags of pre-cooked, pre-sterilized brown rice as mushroom food—classically, Uncle Ben’s or 90-Second Rice. The bags are modified for fresh air exchange and inoculated with a syringe of mushroom spore solution.
The colonized rice is eventually broken up, mixed with a wet coco-coir substrate (growing medium), and compressed into a cake inside a plastic bin—referred to as a “monotub” or “shoebox.” Using pre-sterilized and hydrated mushroom food eliminates labor-intensive preparation, opening up the hobby to people who don’t own a pressure cooker or autoclave, an expensive device that uses steam and pressure to kill bacteria. growing magic mushrooms
We found that rice cups are easy to work with. The project can be started and finished inside the cup, and dozens of cups can be grown in a single go. If a few cups don’t perform well, others likely will. Also, because they’re pre-sterilized and vacuum-sealed, they’re ideal for maintaining a low-touch process and avoiding contamination.
It should be noted, this method saves on contamination risk and minimizes labor, but yields less: Little cups of rice make for small harvests.
Regardless of the trade-offs, this technique is a great place to start and experience mushroom cultivation firsthand, and decide if the hobby is right for
Contamination is a mushroom grower’s arch nemesis
By and large, the biggest snag that new and seasoned mushroom growers experience is contamination. Microorganisms like bacteria, yeast, and fungi can out-compete a mushroom inoculant and ruin a growing project.
Signs of contamination include:
- Sour or funky odors
- Presence of exudates (a yellow liquid that is a defense mechanism)
- Brown or sludgy deposits of rotting rice
- Stalled colonization, or the formation of colored masses—most often green, red, pink, or competing shades of white
Contaminations typically arise from inadequate sterilization techniques, dirty inoculants/spore solutions, unsanitary cultivation environments, or even a grower’s body or clothing. Each time a project is handled or exposed to open air, a growing magic mushrooms risks contamination.growing magic mushrooms
In a homegrow environment that lacks laboratory-standard sterilization and clean-room equipment, our best defense against contamination is to interact with a grow project as little as possible.
How long does it take to grow shrooms?
The prep and inoculation phases can be knocked out in an afternoon. After inoculation, colonization can take anywhere from two to eight weeks, depending on environmental conditions, genetics, and inoculation technique. Once the cups are colonized and birthed, pins and fruits will form in about one to four weeks.
A full growth cycle of mushrooms can take anywhere from one to three months.
What type of shrooms should I grow?
Psilocybe cubensis mushrooms—aka “cubes”—are the de facto species of choice for both amateur and experienced shroom cultivators. The species is prized for its worldwide availability, potent psychoactive properties, and ease of cultivation.
A saprophytic decomposer species, cubensis eat dead organic matter. Where other psychedelic species prefer particular hardwoods, cubes are far less picky and can get nutrition from whole foods, manure, and decomposing organic waste.
The majority of commercially available psychedelic mushroom spores are cubensis subspecies: Names like Golden Teacher, Yeti, and Penis Envy are all offshoots of the cubensis, arising from mutations found in the wild or discovered by multi-spore inoculations and stabilized over time. growing magic mushrooms
You’ll notice we’ve been careful to avoid the term, “strain.” That’s because the mushroom community shuns the word, instead favoring “subspecies.” Unlike cannabis grown from seed, hundreds, if not thousands, of unique subspecies can result from a single multi-spore inoculation. So the concept of a strain doesn’t accurately describe what a person gets when they buy a spore syringe for growing mushrooms.
Supplies needed to growing magic mushrooms
You’ll need the following supplies for the inoculation phase:
- Spore syringe or liquid culture ($5-25)
- Minute Rice Brown Rice Cups ($2-3/four cups)
- Micropore Tape
- 2 or more 6-quart Sterilite Totes, or similar plastic boxes ($1-2 each)
- Nitrile gloves
- Rubbing alcohol ($2-3)
- Bleach
- Spray bottles for alcohol and bleach
- Fine-mist bottle for water
- Air Disinfectant
- N95 mask ($1-2)
- Torch (butane, propane, or MAPP gas), alcohol lamp, or similar
Supply list for the substrate phase:
- Coco coir
- Vermiculite (optional)
- Gypsum (optional)
- Distilled water
- 5-gallon painters bucket and lid
- Nitrile gloves
- N95 mask
How to grow psychedelic mushrooms
(Anonymous)
growing magic mushrooms can be broken down into seven phases:
- Preparation
- Inoculation
- Colonization
- Substrate assembly
- Birthing
- Fruiting
- Harvest
Preparation on growing magic mushrooms
Preparation and inoculation can be done in an afternoon.
Once you’ve bought your supplies, you’ll need to pick a work area and sanitize it as deeply as possible. And we mean deeply.
Your work area should be away from any sources of moving air like drafty windows, air vents, or doors to the outside. If vents are present, close or seal them off with plastic sheeting and tape. Always shut off AC units or central air before working on a growing magic mushrooms project.growing magic mushrooms
Don’t work in a carpeted room if possible—carpets are notorious for trapping contaminants.
Ideally, you should wipe down walls and clear dust from all surfaces, and vacuum or sweep and mop your work area. Work top to bottom and using rubbing alcohol or bleach. growing magic mushrooms
Set up a table and spray it down with rubbing alcohol. Stainless steel tables are the standard, but anything non-porous will work.
Spray the air with Lysol or a similar aerosol disinfectant designed for mitigating airborne contaminants.
After the room is sanitized, we recommend cleaning your body. Mycologists often prepare for inoculation similar to how a surgeon scrubs down for surgery. Take a shower, brush your teeth, and put on clean clothes. Right before heading into your work area, wash your hands with soap.
Once you and your work area are clean, put on an N95 mask and enter the room.
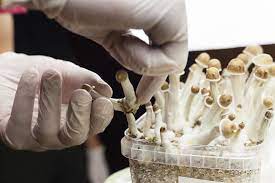
Inoculation phase
Gather the spore syringe and rice cups, as well as the torch, micropore tape, rubbing alcohol, paper towels, and nitrile gloves. Wipe everything with rubbing alcohol, and line it up on the table.
To inoculate, first, vigorously shake your spore syringe for a few minutes, making sure to break up any clumps of spores. Spores need to be evenly distributed through the solution.
Next, flame-sterilize the syringe needle. The needle should get red hot.
Note: don’t break the factory seal on the rice cup—that stays sealed until later. Don’t use too much solution, as excessive moisture levels will encourage wet rot and bacterial infection.
When the needle has cooled, puncture the plastic covering on a rice cup in the middle and dispense between 0.5-1cc of spore solution.
After inoculation, use the needle tip to make a dozen or so additional holes in the rice cup for air exchange, within ¼” of the inoculation site. Then cover the holes with two pieces of micropore tape, working quickly to avoid contamination.
The spores now have a source of food and will germinate.
Repeat this process for each cup, sterilizing the needle between inoculations.
To minimize the risk of contamination, try to avoid moving your hands around a lot and keep your work surface wet with rubbing alcohol throughout the process.growing magic mushrooms
Colonization phase
After inoculation, store the rice cups inside a 6-quart Sterilite plastic box tote or similar plastic container and close the lid.
Spores will begin to germinate, pair up, and exchange genetic information, maturing into a mycelial network.
To encourage a timely rate of colonization, store the cups at around 65°F. Warmer temps will encourage a quicker colonization, but anything past 70-75°F can awaken dormant contaminants. Keeping the environment cool will elongate colonization and stave off competing microorganisms. growing magic mushrooms
Once a week, gently agitate your rice cups in a back-and-forth or swirling motion, but don’t shake the cup up and down. Doing so can expose grains of rice to the inoculation area, where contaminants are most likely to be hiding.
You can monitor the colonization process by holding a cup up to a lamp: The dense mycelium restricts light from passing through, thereby appearing whiter than the uncolonized top portion of the rice.
(Anonymous)
Colonization usually takes between two to eight weeks. When the rice is fully colonized, it will solidify into a unified mass, eventually feeling heavy at the bottom of the cup. Colonization can be confirmed by shaking the cup. Once few or no loose grains are felt rattling around, move on to the substrate assembly and birthing phases of growing magic mushrooms.
How to make a growing magic mushrooms substrate
When a rice cup is fully colonized, between a couple of weeks and a couple of months, you can move on to making a substrate, or growing medium, and birthing growing magic mushroomss.
Make your substrate 8-24 hours ahead of time.
For a substrate, most people use a combo of coco-coir, vermiculite, and gypsum—dubbed CVG—but it’s also fine to just use properly hydrated coco-coir. You can buy coco coir on its own or hydrate it yourself.
“Field capacity” refers to the ideal amount of water in a substrate. A substrate that’s adequately hydrated to field capacity will establish Goldilocks-zone, aerobic soil conditions, and encourage healthy mushrooms. Field capacity is when just a few drops of water are produced when squeezing a handful of substrate.growing magic mushrooms
Use a substrate within 24 hours. The longer substrate sits around, the more likely it is to become contaminated.
Birthing phase: How to make shroom cakes
(Anonymous)
Birthing only takes an hour or so, depending on how many rice cups you have. Before birthing, clean your work area again. Remember, your work area is like a surgical theater and you’re the doctor. Cleanliness and hygiene are a home mycologist’s best allies.
When you’re all cleaned up—wearing a mask and gloves—it’s time to birth your cups.
First sanitize a spoon with rubbing alcohol, open a rice cup by breaking the seal, and break up the consolidated rice. Add a small handful of substrate to the cup and mix it in with the inoculated rice.
Once the rice is evenly distributed throughout the substrate, gently compress the mix and add another layer of substrate. This layer will serve as a barrier between open-air contaminants and the rice mixture.
Now cups can be introduced to fruiting conditions.
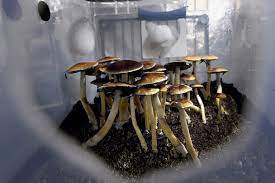
Shroom fruiting phase
(Anonymous)
What are fruiting conditions for shrooms?
growing magic mushrooms need a humid environment and fresh air. To create such an environment, we use a well sanitized 6-quart Sterilite plastic box. After disinfecting the plastic box with rubbing alcohol, spray the inside with a fine-mist water bottle to increase humidity.
Put the cups inside the plastic box with the lid turned upside down—this leaves a small gap for air exchange, allowing fresh oxygen to displace the CO2 that mushrooms make while growing.
What grow light should I use for shrooms?
You don’t need to do or buy anything fancy. The diffused light of a window will work (the easiest option), as well as fluorescent lights and LEDs that mimic the spectrum of the sun. If you grow weed and have a T5 or T8 fluorescent tube hanging around, you can use that. The light simply needs to warm the box.
Some mushroom growers swear by a 12-hour light/12-hour dark cycle, which can be achieved with an outlet timer, but through observation, we feel that regulating temperature fluctuations is more important than cycles of light and dark.
Regular fluctuations in temperature create condensation and humidity. You won’t need to water cups directly, only mist the inside of the box before adding them in. This jumpstarts the formation of fruits via evaporation and rehydration of the substrate during day and night cycles.
Set it and forget it
Once you introduce your cups to fruiting conditions—high humidity, ample fresh air, and a day-night light cycle—simply leave your project alone. Resist touching it. No daily misting, fanning, etc. is needed. Patience is the key.
If the condensation on the inside of the bin evaporates entirely before fruits form, remove the cups and mist the walls again. Never mist the cups, fruits, or pins directly. Too much water will drown the mycelium and encourage pathogens to take root.
How to fruit shroom cakes
The fruiting phase can be broken down into three stages: pinning, elongation, and sporulation.
What is pinning?
Mushrooms start as knots of hypha—like individual roots, but part of the mycelium—on the surface of a mycelial network. They grow where water droplets condense and evaporate.
Imperceptible to the untrained eye, these knots are the beginnings of primordia—better known as “pins” due to their pinhead-like appearance. Their formation is usually referred to as “pinning.”
When do I mist my shrooms? Should I fan my box?
Only mist the walls and floor of the plastic box, and only when the last misting has evaporated, especially once pins form. Do not mist your cups, substrate, or fruit bodies.
The plastic bin will first start to dry out where fresh air enters. If a dry zone doesn’t form after a few days, reposition the upturned lid to widen the gap to increase fresh air exchange.
Note: Some people close the lid and fan their fruiting chamber with the lid every so often. We don’t recommend this approach as it can mess with humidity levels. We suggest a passive fresh air exchange. As a rule of thumb, less interaction is more.
Elongation and sporulation stages
(Anonymous)
As fruits mature, they will elongate and gain mass. This is when adequate fresh air exchange becomes critical. If fruit bodies bruise to blue, this indicates a CO2 buildup and growth will soon halt if the rate of fresh air exchange isn’t increased.
Fruits are ready to harvest when the caps open up, signaling that sporulation will soon begin: The veil connecting the cap to the stem breaks and within days spores will be visible on the substrate below—the mushroom’s way of repeating the lifecycle.
It’s common to harvest shortly before or after the veil breaks to avoid dark, inky spore deposits falling onto and coloring any underlying mushrooms.
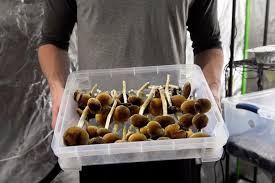
How to harvest shrooms
Frequent ask questions
How long does it take to grow magic mushrooms at home?
The time it takes for your mycelium-colonized substrate to put forth harvestable fruits depends on several factors. But the whole process of cultivating mushrooms should take between one and two months.
When to harvest psilocybin shrooms?
You should be able to harvest your fruits five to 12 days after they first begin to sprout from the mushroom substrate.
The trick is to harvest them before the veil breaks, i.e., before they fully mature and release their spores. In other words, the gills should still be covered. At this stage, your mushrooms should also have light, conical caps.
How to make a spore syringe?
We’ve included instructions for making a spore syringe above. You’ll need a sterilized knife or scalpel, a sterile paper sheet, and a disinfected glass or jar to gather psilocybin spores from a mushroom that’s been allowed to mature. Add the mushroom spores to a glass of distilled water and load your sterile syringe from that. After leaving it at room temperature for a few days to hydrate, you can store it in the fridge for at least a couple of months.
How to grow psilocybin mushrooms at home without spores?
Use a Psilocybe cubensis grow kit if you don’t want to add the mushroom spores yourself. The typical P. cubensis grow kit comes with an already colonized substrate for growing mushrooms in a box. They’re available for different P. cubensis varieties, as well as different species.
What is the best growing magic mushrooms substrate?
Although tried and tested by generations of mushroom growers, the brown rice flour and vermiculite substrate may not be the best choice for everyone. It depends on your priorities. Brown rice flour is good for growing in bulk, but coir (coconut fiber extract) may be cheaper and easier to use. Then there’s whole brown rice (not flour), which supposedly yields more potent fruits.
Pasteurized horse manure is another good option since it’s high in phosphorus, nitrogen, and potassium. And throwing spent coffee grounds into the mix (up to a quarter of the whole) could help speed up colonization. Coffee grounds are economical too. Ninety-nine percent of coffee biomass that doesn’t end up in the cup is usually just thrown away. growing magic mushrooms
Some growers say the best mushroom substrate is crammed full of nutritional diversity. However, too many nutrients from too many different sources can lead to contamination. As a beginner, you’re better off keeping things simple–not to mention inexpensive enough for trial and error.
What’s the difference between psilocybin mushroom spawn and substrate?
As you learn more about growing mushrooms indoors, you’re likely to see the terms “spawn” and “substrate” used seemingly interchangeably or just incorrectly.
Put simply, “substrate” (the brown rice flour/vermiculite cakes in the PF Tek method) becomes “spawn” if it’s used to colonize a second bulk substrate made of coir, manure, etc., in the fruiting chamber.
If you’re fruiting directly from the cakes, as this guide directs, your mushroom substrate remains the “substrate,” even after removal from the jars.
What are the best Psilocybe cubensis strains?
As mentioned in the guide, some of the most popular P. cubensis strains (or varieties) for beginners are the B+ and Golden Teacher mushrooms. Experienced growers may prefer Penis Envy.
However, as with your choice of substrate, the best P. cubensis strain for you will depend on your priorities for cultivating mushrooms.
How to grow magic truffles?
Forget about growing magic mushrooms in a box! Truffles are often grown in jars instead of a fruiting chamber. Another key difference from the PF Tek method is the use of a boiled rye grain (aka rye berries) substrate.
Popular truffle varieties include Psilocybe mexicana and P. tampanensis, also known as “philosopher’s stones.”
Where can I find supplies for growing mushrooms?
One of the great things about the PF Tek method is that supplies are widely available. What you haven’t already got lying around the house can be found at your local hardware store.
Alternatively, you might consider a prepackaged option that doesn’t require materials sourcing. For example, Third Wave’s Mushroom Grow Kit arrives with nearly everything you need and is 100% sterilized to avoid contamination risks.
You’ll only need a specialist supplier for your first load of psilocybin spores. Here is a reference for finding high-quality spores from reputable suppliers. growing magic mushrooms
Conclusion: Why You Should Grow Your Own Mushrooms
The world is experiencing the third wave of psychedelics. The first wave happened a long time ago when early civilizations began dosing each other with entheogenic plants and fungi for the purposes of divination and healing.
The second wave started (and ended) in the 1960s with the counterculture and the emergence of hippie culture.
Now, we’re entering the third wave as more people become interested in the use of psychedelics for personal growth, spirituality, and healing.
There’s no better way to get into the world of psychedelics than by cultivating your own. Magic mushrooms are safe to grow and use and offer an exceptional array of existential and physical benefits.
Growing them yourself can bring us closer to nature, give us a deeper understanding of this incredible psychedelic substance, and could even save us some money along the way. growing magic mushrooms
Useful Links
Legality Of Growing Magic Mushrooms
It is generally legal to buy and possess magic mushroom spores because they do not contain psilocybin. The exception to this law is in California, Georgia, and Idaho, where psilocybin mushroom spores are illegal. In these states, legislators are trying to prevent people from cultivating magic mushrooms.
Outside of these three states, once the spores germinate, the psilocybin mushrooms that result will be illegal since they contain psilocybin. So, if you’re thinking of growing them, you should be aware of the potential legal consequences.
A Recap of How on growing magic mushrooms
In this comprehensive guide, we have covered various techniques for growing magic mushrooms, from beginner to advanced levels, including PF TEK, Grain to Shoebox TEK, and monotub cultivation, along with advanced methods like laminar flow hood construction, agar work, and cloning.
Mushroom cultivation is an ongoing learning process that requires patience, attention to detail, and a willingness to experiment with new techniques. By continually refining your methods and sharing your experiences, you can improve your skills and contribute to the community’s collective knowledge.growing magic mushrooms
As you progress in your mushroom cultivation journey, consider engaging with fellow growers through online forums, workshops, or local meetups. Sharing your experiences and learning from others can lead to new insights, help troubleshoot issues, and foster a sense of camaraderie among cultivators.